


The digital rulebook contains the compiled main rulebook in one location in a printable format with hardcopy page references.
Print or save as a PDF to create a two-column, paged layout. For best printing results, it is recommended to use a non-mobile device. (Note: Safari and iOS devices do not support multi-column printing.)
Print or Save as PDF
Print as single column
This chapter simply summarizes the sequence of playing a Warhammer battle, and points you to the relevant parts of the book that explain how each stage works.
You will need two armies to play a Warhammer battle, so the first thing to do is assemble your forces. You can simply use all the models in your collection, but most players use the system of points values and army lists to ensure their forces are evenly matched for a closely fought game. This system is explained in the Choosing Your Army chapter.
The Fighting a Warhammer Battle chapter presents six ‘pitched battles’. Each of these explains how to play a slightly different type of battle, ranging from a straightforward clash of battlelines to a fight in a mountain pass or the defence of a watchtower. Players can roll a dice to decide which pitched battle they will play or simply choose one.
Next, you will need a battlefield, be it the kitchen table, the floor or a fully modelled wargames board.
The players set up terrain for their armies to fight over, representing haunted woods, fortified watchtowers and other strange features that make up the landscape of the Warhammer world. How to do this is also covered in the Fighting a Warhammer Battle chapter.
The two armies are deployed facing each other across the battlefield, ready to fight. Details on how to deploy can be found in the Fighting a Warhammer Battle chapter.
Each of the pitched battles includes a map showing you where on the table each player can place his models, and also tells you which side will take the first turn of the game.
Fight out the battle, with players taking turns to act with their army, using the rules that follow. This chapter starts with basic rules that apply to all models, and cover the standard sequence of moving, shooting and fighting. These basic rules are all you will need for infantry models, and will get you by for your first game or two. They are followed by extra rules that apply only to certain models such as monsters, heroes or warriors armed with unusual weapons. Finally there is a chapter that explains the effects of the fantastical terrain of the Warhammer world.
Each pitched battle explains how many turns to play for and how to work out who has won the game. In most cases the victor is the side that has destroyed more of the enemy, and so it is often obvious who has won, as the other side’s army is in tatters – dead or fleeing! Other battles are decided by seizing enemy banners or capturing a watchtower. Whatever the outcome, only a rematch will give you the chance for further glory or sweet revenge.
In a game of the size and complexity of Warhammer, there are bound to be occasions where a situation is not covered by the rules, or you can’t seem to find the right page. Even if you know the rule, sometimes it is just a really close call, and players don’t agree on the precise outcome.
Nobody wants to waste valuable gaming time arguing, so be prepared to interpret a rule or come up with a suitable solution for yourselves (in a manner befitting gentlemen, of course). If you find that you and your opponent cannot agree on the application of a rule, roll a dice to see whose interpretation will apply for the remainder of the game – on a result of 1-3 player A gets to decide, on a 4-6 player B decides. Then you can get on with the fighting! Once the game is over, you can happily continue your discussion as to the finer points of the rules.
The Citadel miniatures used to play games of Warhammer are referred to as ‘models’ in the rules that follow. Models represent a huge variety of troops, ranging from cowardly Goblins and noble Elves, to mighty Dragons. Each model is an individual playing piece with its own skills and capabilities. To reflect all the differences between such warriors, each model has its own characteristics profile.
Warhammer uses nine different statistics or characteristics to describe the various attributes of the different models. All characteristics are rated on a scale from 0 to 10 – they cannot go below 0 or rise above 10.
Often called Move, this shows the number of inches a model can move on the battlefield under normal circumstances. For example, a Man with a Move of 4 (M4) can move up to 4" when moving at full rate. A horse moves far faster and therefore has M8.
This defines how accomplished or skilled a warrior is with his weapons, or how determined and vicious a monster is. The higher the score, the more likely the model is to hit an opponent in close combat. An ordinary Man has WS3, whilst a battle-hardened hero might have WS4, WS5 or possibly even higher!
This shows how accurate a warrior is with ranged weapons such as bows or handguns. The higher this value is, the easier a creature finds it to hit with missile attacks. An ordinary Man has BS3, but a keen-eyed Elf has BS4. Some monsters have natural weapons that can be used at range (they might spit venom, for example) and they often use BS to determine whether they hit or not.
Strength gives a measure of how strong a creature is. An exceptionally puny creature might have a Strength characteristic of 1, while a mighty Giant has S6. Men have S3. Strength tells you how hard a model can hit and how easily it can hurt an opponent it has struck in close combat.
This is a measure of a creature’s ability to resist physical damage and pain, and reflects such factors as the resilience of a creature’s flesh, hide or skin. The tougher a model is, the better it can withstand an enemy’s blows. A normal Man has T3, but a creature such as a Treeman, with tough wooden flesh, has T6!
This shows how much damage a creature can take before it dies or is so badly hurt that it can’t fight any more. Most men and man-sized models have a Wounds characteristic value of 1. Large monsters and mighty heroes are often able to withstand several wounds that would slay a smaller creature, and so have W2, W3, W4 or even more.
This indicates how fast a creature can react. Creatures with a low Initiative score (Orcs, with Initiative 2) are slow and cumbersome, while creatures with a high Initiative score (Elves, with Initiative 5) are quicker and more agile. Humans have Initiative 3. In close combat, Initiative dictates the order in which creatures strike.
This shows the number of times a creature attacks during close combat. Most warriors and creatures have an Attacks value of 1, although some elite troops, monsters or heroes may be able to strike several times and have A2, A3 or more.
Leadership shows how courageous, determined, and self-controlled a model is. A creature with a low value is very unruly or cowardly, to say the least! Men have Ld7, which is average, whilst easily scared Night Goblins have a Leadership value of only 5.
Every Warhammer model has a profile that lists the value of its different characteristics. The examples below show the profiles for an Orc, a Man, an Elf and a Skaven.
| M | WS | BS | S | T | W | I | A | Ld | |
|---|---|---|---|---|---|---|---|---|---|
| Orc Boy | 4 | 3 | 3 | 3 | 4 | 1 | 2 | 1 | 7 |
| Empire Halberdier | 4 | 3 | 3 | 3 | 3 | 1 | 3 | 1 | 7 |
| High Elf Spearman | 5 | 4 | 4 | 3 | 3 | 1 | 5 | 1 | 8 |
| Skaven Clanrat | 5 | 3 | 3 | 3 | 3 | 1 | 4 | 1 | 5 |
As you can see, an Orc and a Man are similar in many respects. They both move at the same speed (4"), and they both have the same Weapon Skill and Ballistic Skill values, which means they are very evenly matched in combat. Both have the same Strength value, so they can deliver blows with equal potency. When it comes to Toughness, however, the Orc wins over the Man – the Orc’s value is 4 compared to 3. This is not a vast difference, but it does make the Orc better able to withstand blows and gives it the edge in any hand-to-hand fighting.
Both creatures have 1 Wound, which is the normal value for man-sized creatures. The Orc loses out, however, when it comes to Initiative. This is not a terrible disadvantage, but it does mean that the Man will get to strike his blows before the Orc does when they get stuck into hand-to-hand fighting. Both races have the same Leadership of 7, which is average.
The Skaven is noticeably quicker than a Man or an Orc, with both Movement and Initiative values higher. However, the Skaven ratmen are distinctly cowardly, with their Leadership of 5. The Elf meanwhile is clearly superior, with above-average Movement, Weapon Skill, Ballistic Skill, Initiative and Leadership characteristics. Only Strength and Toughness remain at a normal level for these elite warriors.
In addition to its characteristics profile, each model will have a troop type, such as infantry or cavalry, which we discuss in more depth in the Troop Types chapter. It might also have a save of some kind, representing any armour or magical protection it might have, and it could be carrying one or more shooting or close combat weapons (see Weapons) or might have one or more special rules (see Special Rules). Don’t worry about any of this for now – for the moment it’s enough that you know about these aspects of the model.
Some creatures have been given a value of ‘0’ (often shown as a dash: ‘–’) for certain characteristics, which means that they have no ability whatsoever in that skill. This usually applies to creatures unable to use missile weapons, so they have BS0 or BS-, but it might equally well apply to other characteristics too. For example, some creatures or war machines may have no Attacks (A0 or A-).
If any creature or object has a Weapon Skill of 0 then it is unable to defend itself in close combat, and any blows struck against it will therefore automatically hit.
If at any time a model’s Strength, Toughness or Wounds are reduced to 0 or less by magic or a special rule, it is slain and removed from play.
The models that make up your Warhammer army must be organised into ‘units’. A unit usually consists of several models that have banded together, but a single, powerful model such as a lone character, a chariot or a Dragon, a war machine and its crew, and so on, are also considered to be a unit.
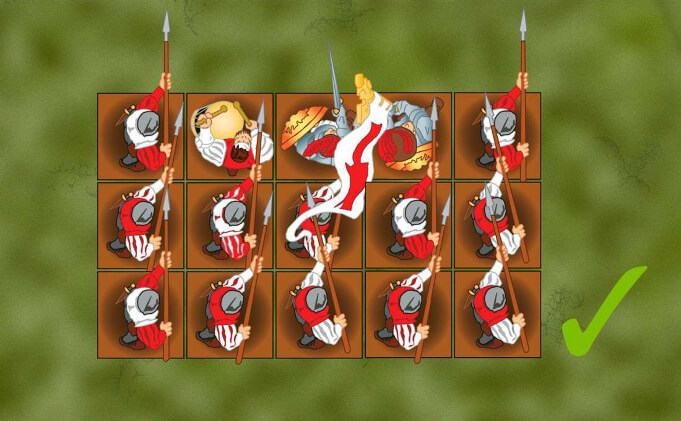
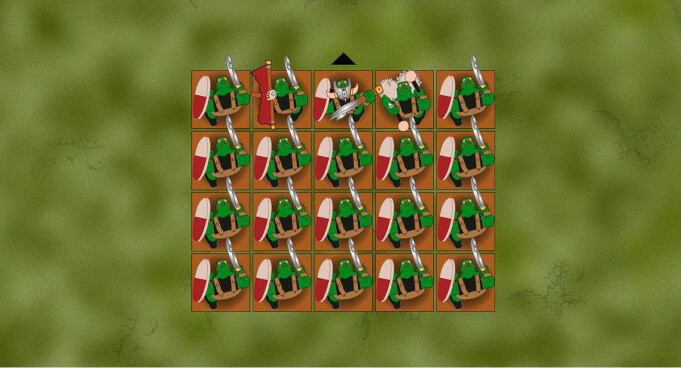
A unit consists of 1 or more models that are arranged in orthogonal base contact with each other, which is a fancy way of saying ‘edge-to-edge and front corner to front corner’. See the diagrams below – it’s much clearer as a picture than it is in words.
All models in a unit must face the same direction.
In addition, all models in the unit must be arranged in a formation that consists of one or more horizontal lines, called ranks and a number of vertical lines, called files. This is why we often refer to basic warriors as ‘rank and file’ troops.
As far as possible there must be the same number of models in each rank. Where this is not possible it must be the rear rank that has fewer models. Once formed into a unit, the models move and fight as a single entity for the rest of the battle.
Here, you can see examples of correct and incorrect formations.
Some of the models in a unit (probably quite a lot of them) will die as the battle progresses. When casualties occur, models are removed from the back rank of the unit. If the unit is reduced to a single rank, casualties must be removed evenly from either end of the line.
Last, but not least, a model has a forward, flank and rear arc based on the direction that it is facing. We’ll be using this later to work out what the model can attack, as well as calculating which side of the model an enemy will be able to charge as the game goes on.

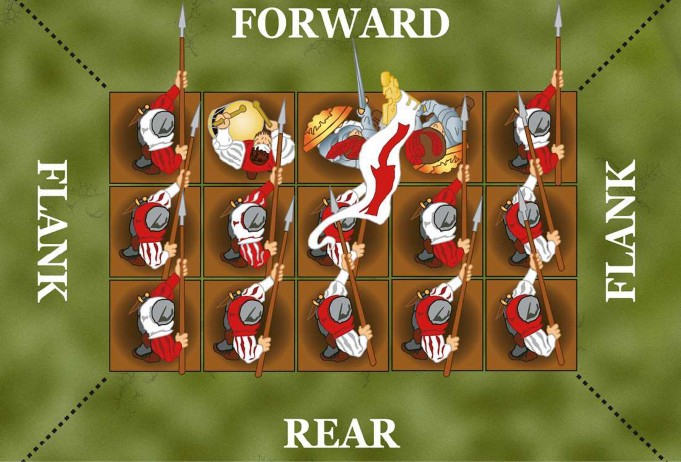
It’s normally easy to tell which direction a model is facing – he’ll (it’ll?) be aligned squarely with one of his base’s edges.
Sometimes, however, it’s not so clear. This doesn’t tend to be a problem in a unit, where all the models are assumed to face the same way (and a command group can normally be found in the front rank). If you have a single model, such as a monster or character, whose facing is not obvious, make sure that your opponent can tell which way it’s facing – it could prove crucial in the battle!
We’re almost ready to dive into the turn sequence that drives the bloody business of Warhammer. However, before we begin, there are few basic ideas and game mechanics that it’s worth discussing. These are essentially principles that are so broad that they pop up again and again while you’re playing a game, so it makes a lot of sense to establish them before getting caught up in the more specialised rules that you’ll find later on.
In Warhammer, distances are measured in inches (") with a tape measure. You can always check the distance before you declare an action, such as charging or shooting.
This allows you to check whether your units are in range of their target before they launch an attack. After all, our warriors are all led by experienced campaigners and we can assume that they can accurately judge the range of their weapons, even if we, their generals, cannot (one does not, after all, keep a dog and then bark himself).
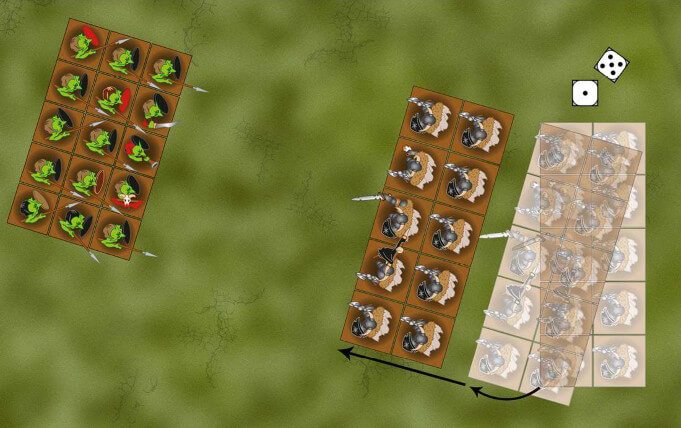
Distances between models and all other objects (which can be other models, terrain features and so on. ) are always measured from closest point on one base to the closest point on the other base.
Distances between units are always measured to and from the closest models in each of the units (see the diagrams below). Sometimes units will be mounted on movement trays for ease of use. Nevertheless, always use the model's base, and not the movement tray, as the reference point when taking your measurements.
So, for example, if any part of a model's base is within 6" of the base of an enemy model, the two models are said to be within 6" of each other.
Sometimes the rules will call upon a unit to move directly towards another unit, or some other feature on the battlefield. Where this is the case, draw an imaginary line between the centre of the unit and its destination, and move the unit forward along this line a number of inches equal to the distance stated.

You'll often need to roll dice to see how the actions of your models turn out – how effective their shooting is, what damage they've done in close combat, and so on.
Almost all the dice rolls in Warhammer use standard six-sided dice, also known as D6, but there are some exceptions, which we will look at next.
In rare circumstances you may be told to roll a D3. As there's no such thing as a three-sided dice, use the following method to determine a score between 1 and 3. Roll a D6 and halve the score, rounding up. Thus 1 or 2 = 1, 3 or 4 = 2 and 5 or 6 = 3.
Warhammer uses two special dice: the artillery dice (marked 2, 4, 6, 8, 10 and Misfire) and a scatter dice (marked with arrows and Hit! symbols). These dice are mostly used to represent the effects of various war machines, such as cannon and stone throwers.
Note that, except where clearly specified, the artillery and scatter dice cannot be re-rolled. We've not talked about re-rolls yet, but we will do shortly.
It's common practice for players to refer to the artillery dice as a 'misfire dice' – chiefly because you can guarantee that it'll roll a misfire at the most inappropriate moment. Conversely, more superstitious players refer to it slavishly as an artillery dice, simply because they believe that saying the word 'misfire' is enough to jinx a forthcoming dice roll. Thus has been borne the convention that it is an 'artillery' dice when you roll it, and a 'misfire' dice when your opponent does.
Some rules require that you choose a random direction. To do so, roll the scatter dice, and use the direction indicated by the direction of the arrow. If you roll a Hit!, use the arrow shown on the Hit! symbol to determine the direction.
Sometimes you'll be called upon to divide the result of a dice roll, a characteristic or some other value. Where this happens, any fractions should always be rounded up. So a 2D6 roll of 7, halved, would be a result of 4 (3.5 rounded up). Similarly, 10% of a unit of fifty one models, rounded up, would be 6 models.
Sometimes, you may have to modify the result of the dice roll. This is noted as D6 plus or minus a number, such as D6+1. Roll the dice and add or subtract the number given to or from the score (as appropriate) to get the final result. For example, D6+2 means roll a dice an add 2 to the score, giving a total between 3 and 8.
You may also be told to roll a number of dice in one go, which is written as 2D6, 3D6 and so on. Roll the indicated number of dice and add the scores together, so a 2D6 roll is two dice rolled and added together for a score of 2-12. Another method is to multiply the score of a dice by a certain amount, such as D6x5 for a total of between 5 and 30.
In some situations, the rules allow you to pick up and re-roll a dice. This is exactly what it sounds like – pick up the dice you wish to re-roll, and roll it again. The second score counts, even if it means a worse result than the first, and no single dice can be re-rolled more than once, regardless of the source of the re-roll.
If you re-roll a single 2D6 or 3D6 roll, you must re-roll all of the dice and not just some of them, unless the rule granting the re-roll specifies otherwise.
If the rules require players to roll-off, this simply means that each player rolls a dice and the player that scores the highest result wins the roll-off. If the players roll the same result, both dice must be re-rolled again until one player is the winner – any modifiers that applied to the first dice roll are also applied to any further rolls.
Sometimes you'll be called upon to randomly select something – often a model, but sometimes a magic item, a spell or similar. Where this is the case, simply assign a D6 result to each of the things the random selection must be made from, and roll the dice to make your random choice. If you have fewer than six items to randomise between, simply re-roll any unassigned results until you roll an assigned number.
For example, a player has to randomly select one of five models. He assigns each model a number between 1 and 5, and rolls a D6, re-rolling results of 6 until he gets a number between 1 and 5.”
There'll be occasions when a dice will end up not lying flat – normally because it's got caught in a wedge of terrain or propped up against a unit. Such 'cocked dice' are a touch inconvenient, and certainly they seem to bedevil important rolls more often than trivial ones. I find the best way of dealing with a cocked dice is to re-roll it if the result isn't clear. Other players prefer to re-roll any dice that isn't totally flat (thus avoiding any subjectivity) or eliminate the problem altogether by making sure they only roll dice on a totally flat surface.
Some spells and war machines are so powerful that they don't just target a single model or unit, but have an 'area effect' which might encompass (and often utterly devastate!) several different units. To better represent these, Warhammer uses a series of three different templates:
In the Island of Blood boxed set we have included transparent plastic versions of these templates to use in your games.
The templates are used as a way of determining whether or not models have been hit by an attack that has an area of effect or blast radius. When an attack uses a template, it will explain how the template is positioned, including any kind of scatter that might occur (scatter is discussed more completely next in this chapter). To work out which models are hit, you normally need to hold the template over an enemy unit or a particular point on the battlefield, and then look underneath to see which models' bases lie partially or completely underneath the template.
Normally, any model that is fully or even partially underneath the template is hit automatically with the effect described in the special rules for the attack. Some models, such as characters riding chariots and monsters, might have several different locations that can normally be hit separately – in these cases a template is assumed to hit all the locations on the model. Remember that a model's base is counted as being part of the model itself, so as long as any part of the base is under the template everything is hit.
Sometimes a rule will call for an object (a template, counter or even a unit) to be placed on the battlefield and then scattered. When this occurs, follow this procedure:
Place the object on the battlefield, as instructed by the rule. Roll a scatter dice to determine the direction of scatter, and any other dice required by the rule to determine the scatter distance. For example, if something is said to 'scatter 2D6" in a random direction' then you'd roll the scatter dice for the direction and 2D6" for the distance. It's normally a good idea to roll these as close to the scattering object as possible, to minimise the inaccuracy that will inevitably creep in as you attempt to match the vector.
If a Hit! is rolled on the scatter dice, the object does not move – leave it in place and resolve the rest of the rule.
If an arrow is rolled, move the object in the direction of the arrow and the distance (in inches) shown on the other dice, ignoring intervening terrain, units, etc, unless the rule states otherwise. Once the object has scattered to its final position, you can resolve the effects of the rule.
Note that war machines usually use the artillery dice to determine the distance scattered.


You'll notice that some of the rules refer to a 'natural' dice roll – this refers to the actual number the dice rolled, ignoring any modifiers that might apply. This phrase is quite useful as there are quite a few dice modifiers sloshing around in the Warhammer rules, and we sometimes want the dice scores themselves (without the modifiers) rather than the total result (including the modifiers).
A model will sometimes be called upon to take a characteristic test. Such a test could be applied against any characteristic the model has, save Leadership. A Toughness test is a characteristic test, as is a Strength test or an Initiative test, and so on.
Models will not normally have a choice of which characteristic they must use – the characteristic to be tested will be specified in the rule.
To make a characteristic test, roll a D6 and compare the score to the relevant characteristic in the model's profile. If the score is equal to or less than the number in the profile, the test is passed with no ill effect. If the score is greater than the number in the model's profile, the test has been failed, and something nasty will occur, as detailed in the rule that called for the test.
Where a model (or a unit) has more than one value for the same characteristic, as is the case with cavalry, for example, a characteristic test is always taken against the highest of the values.
When taking a characteristic test a natural roll of 6 is always a failure, and a natural 1 is always a success, regardless of any other modifiers. However, if the model has a characteristic of 0 or – it automatically fails the test.
At certain times, a model or unit might be called upon to take a Leadership test. This represents them drawing upon their courage to face disheartening circumstances.
To take a Leadership test, roll 2D6. If the result is equal to or less than the model's Leadership value, then the test has been passed. If the result is greater than the model's Leadership value, a suitably dire consequence will occur, as detailed in the rule that called for the test. This will normally involve the unit turning tail and fleeing from the enemy. Note that a natural, unmodified, roll of 2 (i.e. rolling a double 1) is always considered to be a pass, regardless of any modifiers that might apply.
If a unit includes models with different Leadership values, always use the one with the highest Leadership – warriors naturally look to the most steadfast of their number for guidance.
Line of sight determines what a model can 'see'. Many situations call for you to determine whether or not a model has line of sight. A model normally needs line of sight whenever it wishes to attack an enemy, whether with sword, spell or bow.
Line of sight literally represents your warriors' view of the enemy – they must be able to see their foe through, under or over the battlefield terrain, and other models (friendly or enemy).
For one model to have line of sight to another, you must be able to trace an unblocked line from its eyes to any part of the body (i.e. the head, torso, arms or legs) of the target.
Sometimes, all that will be visible of a model is a weapon, banner or other ornament he is carrying. In these cases, the model is not visible. Similarly, we ignore wings and tails, even though they are technically part of a model's body. These rules are intended to ensure that models don't get penalised for having impressive banners, swords, and so on.
Naturally, you can't ask your models what they can see – they're plastic and metal, so a reply will be some considerable time in coming – therefore you'll have to work it out on their behalf. In many cases, this will be obvious – if there's a hill or building in the way, the enemy might be blatantly out of sight. In other cases, two units will be clearly in view of each other as there is nothing at all in the way. On those other occasions where it's not obvious whether or not one unit can see another, the player will have to stoop over the battlefield for a 'model's eye view'. This means getting down to the level of your warriors, taking in the battlefield from their perspective to 'see what they can see'.
Whilst every effort has been made to make sure that the sequencing of rules is utterly clear, occasionally you'll find that two or more rules are to be resolved at the same time – normally 'at the start of the Movement phase' or similar. When this happens, and the wording is not explicit as to which rule is resolved first, then the player whose turn it is chooses the order.
Finally, it's worth remembering that the rules for Warhammer are broken up into two distinct halves: basic rules and advanced rules.
Basic rules apply to all the models in the game, unless specifically stated otherwise. They include the rules for movement, shooting, close combat and so on, as well as the rules for Panic tests. These are all the rules you'll need for your average infantry model.
Advanced rules apply to specific types of model, whether because they have a special kind of weapon (such as a spear), unusual skills (such as flaming attacks or the ability to regenerate damaged flesh), because they are different to their fellows (such as a standard bearer or a mighty hero), or because they are not normal infantry models (a knight, a cannon or even a Dragon). The advanced rules that apply to a unit are indicated in the entry for the unit in their relevant Warhammer army book.
Where rules apply to a specific model, they always override any contradicting basic rules. For example, the basic rules state that a model must take Panic test under certain situations.
If, however, that model has a rule that makes it immune to Panic, then it does not test for Panic – the advanced rule takes precedence.
On rare occasions, a conflict will arise between a rule in this rulebook, and one printed in a Warhammer army book. Where this occurs, the rule printed in the Warhammer army book always takes precedence.
A Warhammer battle is a chaotic thing. Units of bellowing warriors charge and counter-charge, hacking at the foe with axe, sword and cleaver. The ground trembles to the hooves of galloping cavalry. Archers blacken the skies with arrows, cannons belch forth death and puissant sorcerers wield devastating magic’s.
In order to turn the maelstrom of battle into a manageable game, players alternate moving and fighting with their units. So, one player will move and fight with his forces first, and then the opponent will move and fight. This process is then repeated, with the first player moving and fighting again, and so on until the game is done.
During his turn, a player can usually move and fight will all of his units. For convenience and flow of game play, we divide a player’s turn into four main phases: Movement, Magic, Shooting and Close Combat.
This means you move any models you want to first, then cast spells, then shoot and finally resolve any close combats. This process helps to keep track of what is going on and makes it easier to know when one player’s actions are over and the opponent can start his turn (and take his revenge).
In a complete game turn, both players get a player turn, each divided into the Movement, Magic, Shooting and Close Combat phases, as shown in the Turn Summary .
One game turn will therefore comprise two player turns, each with its own Movement, Magic, Shooting and Close Combat phases. Whenever a rule refers to a 'turn', whether in this book, a Warhammer army book or an expansion, it means 'player turn', otherwise it will specifically state 'game turn'.
While playing your game of Warhammer, you'll occasionally discover exceptions to the general turn sequence, when things are worked out as they occur rather than in any strict order, or perhaps that both players will have to do something at the same time. Occasionally the actions of one player will trigger the sudden appearance of a particular troop type, or may activate some special rule or occurrence. When this happens, the exceptional rule will contain all the information you need to resolve it.
Mastery of the Movement phase is vital to your victory on the battlefield. It is in this phase that you’ll attempt to outmaneuver your foe, by moving your archers and cavalry units to where they can best dominate the battlefield, positioning regiments to threaten the enemy flank and charging your warriors into close combat when the time is right. The Movement phase is broken down into four sub-phases: Start of Turn, Charge, Compulsory Moves and Remaining Moves, which are covered in this chapter.
Moving an army is an important and often decisive part of the Warhammer game. When opposing commanders are well matched, movement can be as challenging and satisfying as a good game of chess. However, unlike a chessboard, the tabletop is not divided into exact squares. Instead, movement is determined using a measuring tape or ruler.
This chapter starts with the common rules for moving units on the tabletop and making basic maneuvers, before diving into the sequence of the Movement phase itself. The same rules govern almost all movement.
Any exceptions that apply to chargers and fleeing troops are discussed in the relevant sub-phase. Also, a few units move in a special way (flying creatures for example). These are exceptions to the usual rules which, for the sake of convenience, are discussed later in the book.
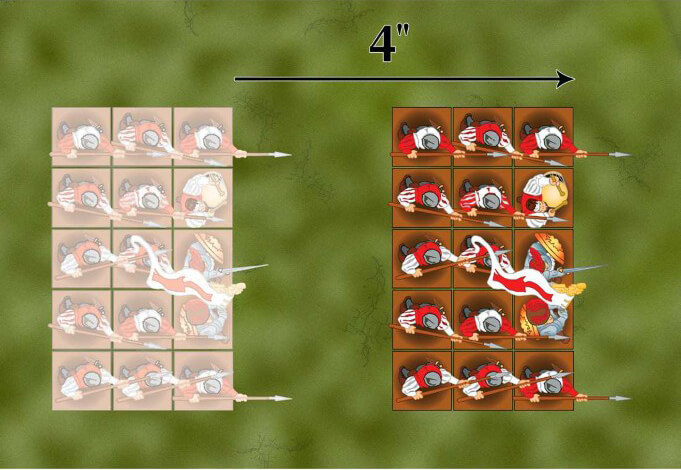
A unit can move straight forward any distance up to its Movement value (M) in inches.
In Warhammer, a basic move for any model, and therefore any unit of models, is to move forward a number of inches up to their Movement characteristic.
Remember that individual models are not permitted to leave their units and so a unit effectively moves as a single entity. If, for whatever reason, there is more than one Move characteristic in the unit, then the entire unit is treated as having the same Move value as the slowest model.
Units are cumbersome, and find it hard to change direction. Models (and units) must move forward in a straight line, unless performing a maneuver, which we'll discuss in a moment.
Whilst moving, a unit is not allowed to approach closer than 1" to another unit, friend or foe, or impassable terrain.
This rule is purely for clarity. It's important to be able to tell at a glance where one unit stops and another begins. If they're too close together, this can be particularly difficult – especially if both units look the same. Similarly, in the case of two units from opposing sides, the 1" apart rule makes it absolutely clear whether or not the two units are merely close to one another (in which case there will be an inch between them) or in close combat (they'll be in base contact).
You'll notice that this rule does not apply to the charge moves discussed later. This is quite sensible, as the whole point of charging is to get a unit into base contact with an enemy. Occasionally, a unit will have approached to within 1" of a unit it did not charge as the result of moving into contact with a unit it did charge. This is perfectly acceptable, although players may wish to nudge the units further apart to maintain a suitable degree of clarity.
There are two specific manoeuvres that enable a unit to change direction or rearrange its ranks: wheel and reform.
As with a normal move, a unit cannot carry out a manoeuvre if doing so would take it to within 1" of another unit.
Also, none of the models in the unit may move more than twice their Movement rate as a result of a manoeuvre (i.e. Men with Move 4 can move up to 8").
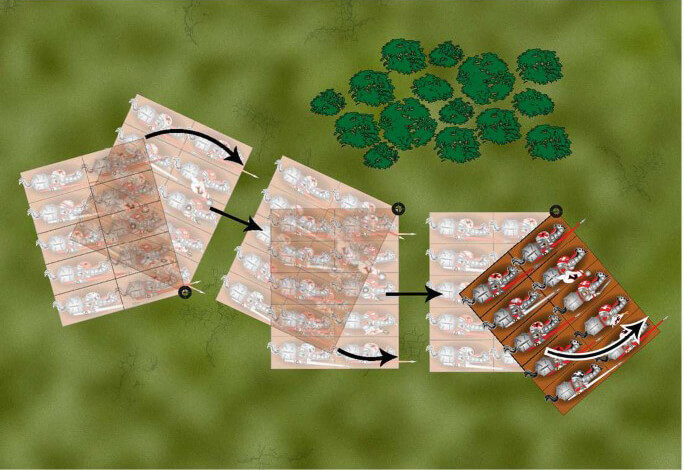
A wheel manoeuvre is a basic turn performed by pivoting the unit around one of its front corners.
Performing a wheel is often the best way of making a modest alteration to the direction a unit is facing whilst still being able to advance. When performing a wheel, the leading edge of the formation moves forward, pivoting round one of the front corners. The unit swings round like the spoke of a turning wheel and completes the manoeuvre facing a different direction. You don't need to measure the distance wheeled by a charging unit, but during the Remaining Moves sub-phase, wheels are measured as follows:
When a unit performs a wheel, every model counts as having moved as far as the outside model. Once the wheel is complete, you may use any movement that the unit has remaining. A unit that is not charging can wheel several times during its move, and indeed can mix forward movement and wheeling, as long as it has enough movement to do so. Units are not allowed to wheel backwards.
You can completely rearrange your unit, so that it is facing in any direction, by giving up all other movement and shooting.
A unit of troops can change the direction in which it is facing and rearrange its formation all at once by means of a maneuver called a reform. The leader issues the order to adopt a new formation and the troops move to assume their new positions.
Keeping the center point of the unit the same, arrange the unit into a new formation of as many ranks as you please, facing whichever direction you wish. Remember that none of the models in the unit can move more than twice their Movement rate.
A reform is a complicated manoeuvre and ordinarily prevents the unit from moving any further that turn, and also stops it from firing missile weapons in the Shooting phase. However, it's worth noting that if the unit has a musician, there is a chance it will be able to carry out the reform and still be able to move, and even shoot if it has the appropriate weapons (see Command Groups for more details).
When a unit reforms, it can change its number of ranks or files (A), the direction it is facing (B), or both (C).


Work your way through the sub-phases shown in the summary below. The units in your army can act in whatever order you wish within each sub-phase, providing that you complete one sub-phase before moving onto the next.
Each unit will normally only be allowed to act in one sub-phase (with the exception of Start of Turn) unless it has special rules that permit it to do otherwise.
At the very start of a battle, it is unlikely that there will be any units in range to charge, and there shouldn't be any fleeing models just yet either.
This means that unless some specific special rules are in play, or you have a model such as a Chaos Spawn that always moves in the Compulsory Moves sub-phase, you can skip straight to remaining moves in the first player turn.
The player first resolves any actions or rules that must happen at the start of the turn.
Some warriors will have special actions they have to perform at the start of the turn (Orcs and Goblins have to test for Animosity, for example). Such rules are not common, and their details will be clearly stated in the relevant Warhammer army book. If you don't have any actions to perform during the Start of Turn sub- phase, it's worth using it as a tide break (or breathing space) between one turn and the next where you can remove stray casualties, errant dice and all the other bits of gaming detritus that builds up on the battlefield as the game goes on.
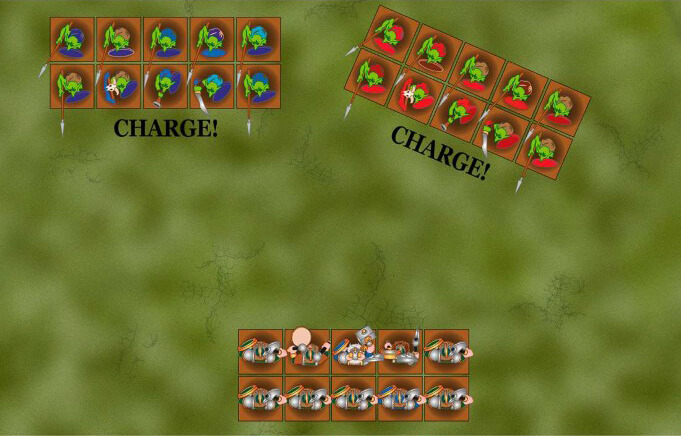
The Charge sub-phase is perhaps the most important part of the Movement phase – this is where you'll unleash your forces to the bloody work of close combat. Battles can be won or lost on the timing of a charge. Charge too soon, and your troops will tire and lose momentum before they reach the enemy and the charge will fall short; wait too long and the enemy will instead charge you; but choose the right moment and the momentum of the charge will sweep your warriors to glorious victory.
In this sub-phase, you'll choose one of your units and declare the charge you want it to make. Your opponent will then have the chance to have his unit hold its ground or react to the charge, either by standing and shooting or fleeing.
Once the charge reaction has been resolved, you can nominate another of your units to declare a charge, and so on, until all of your charges have been declared and reacted to – then you get to make your charge rolls and resolve the charges.
The player picks one of his units and announces which enemy unit it will charge. The enemy must make its charge reaction before another charge can be declared.
The first thing you need to do in the charge sub-phase is to declare any charges you wish to make. Except in a few unusual circumstances, you are never forced to charge. It's almost always your decision, so don't let a glib-tongued opponent tell you otherwise! However, charging is the only way for units to reach close combat with the foe. If you want to attack an enemy then you must charge him – you simply cannot move into close combat without having declared a charge.
To declare a charge you must indicate which of your units is charging, and which enemy unit it is going to charge. For example, you might wish to declare that your Skaven Clanrat unit is charging the High Elf Spearmen.
You're always allowed to measure the distance between the charger and the potential chargee before declaring the charge, as this might well affect your decision whether or not to declare a charge!
When you declare a charge, one or more of the models in your unit must be able to trace a line of sight to the enemy unit, and the target must lie at least partially within the charging unit's front arc.
Not all units can charge. The most common reason for a unit being unable to charge is because it is already fighting in close combat, but other circumstances, such as fleeing, or the effect of a special rule, can also prevent a unit from declaring a charge. These other situations are fairly rare, and they will be clearly explained when you encounter them.
A unit cannot declare an impossible charge – i.e. one that it cannot possibly complete, either because the enemy unit is outside of the chargers' maximum possible charge range, or because intervening obstructions make it impossible for the unit to make a charge move that allows it to move into contact. Note that if such obstruction is another unit, and there is a chance that the intervening unit will move out of the chargers' way before the charge is completed, the charge is 'possible', and therefore can be declared (remember that you still need to see the target to declare the charge though!).
To make such a judgment, you'll need to know how a charge move is completed.
An enemy unit that has had a charge declared against it must hold or perform a charge reaction – shooting at the chargers or retreating from the threat. Once the charge reaction is complete, the charging player can declare a charge with another unit, until he has declared all the charges he wishes to.
When you declare a charge, the target unit isn't necessarily going to sit there passively waiting for your warriors to bear down on it, oh no!
Depending on the target's armament and general fighting ability, it might choose to steel itself for the charge's impact, all the better to fight off the attackers, fire a volley of arrows or other missiles into the oncoming chargers, or simply decide to opt for discretionary valour and flee from the foe.
The response your unit makes when a charge is declared is referred to as a charge reaction. As your opponent declares a charge, you can declare a charge reaction for your charged unit. There are two types of charge reaction: Stand and Shoot and Flee! A unit that does not make a charge reaction is always considered to Hold.
If a unit Holds, it stands fast in place to receive the charge.
A unit will normally elect to Hold if it has no missile weapons and fancies its chances in the coming fight. Units that are already in close combat can only Hold. Holding units stay exactly as they are and await the charging foe.
If a unit elects to perform a Stand and Shoot reaction it readies its missile weapons and gives the charging unit a swift volley. Obviously, a Stand and Shoot reaction can only be declared if the unit has missile weapons of some kind.
As the unit requires time to aim and fire its weapons, a Stand and Shoot reaction can only be declared if the range to the enemy is greater than the charging unit's Move characteristic.
For example, if a unit of Orcs (Move 4) declares a charge against a unit of Empire Handgunners, the Handgunners can only declare a Stand and Shoot if the Orcs are more than 4" away.
If a Stand and Shoot charge reaction is declared, the unit makes a normal, although out of sequence, shooting attack against the charging unit (see the Shooting Phase for more details on shooting attacks). Once the shooting attack, and any Panic test caused by it, have been resolved, the unit is treated as having declared a Hold reaction.
A Stand and Shoot reaction can be declared against an enemy unit that starts its charge outside the firing unit's maximum range – the shooting is resolved normally assuming the enemy is just within maximum range of the shooting unit's shortest-ranged weapon. If the charge fails, for whatever reason, we assume that the chargers closed to within the weapons' maximum range before being driven off.
In most cases, there's no downside to a Stand and Shoot over simply holding. You'll probably manage to pick off a few enemies as they charge, so it's normally a good idea to shoot if you can.
Finally, a Flee! reaction is exactly what it sounds like: the unit turns tail and runs rather than receive the charge.
You'll normally want to declare a Flee! reaction if you think that your unit has no chance of surviving the ensuing fight. A Flee! reaction is not always voluntary – units that are already fleeing must declare a Flee! reaction, and certain terrifying creatures may force an otherwise steady to unit to Flee! instead of other options (see the rules for Terror in the Special Rules chapter).
If a unit chooses a Flee! reaction, for whatever reason, use the following procedure:
It should be noted that a Flee! reaction does not guarantee escape from oncoming chargers. If the fleeing unit rolls poorly and the chargers roll well, the fleeing unit might yet be caught, as we will discuss later.


If the target unit declares a Flee! reaction, the charging unit now has a choice: it can either attempt to complete the charge against the now-fleeing unit, or try to redirect its charge by making a Leadership test. If the test is failed, the charging unit must attempt to complete the charge against its original target. If the test is passed, however, the charging unit can declare a fresh charge against another viable target (the chargee may declare a charge reaction as normal). If there are no other suitable targets to charge, a charging unit cannot test to redirect.
Each unit can only make one redirect per turn.
If a fleeing unit touches the edge of the battlefield (or indeed has spilled over it), the entire unit is removed from play and counts as destroyed. We assume that having fled so far from the battle, the remaining troops scatter, regrouping only after the battle is over.
A unit can normally only declare a charge at a single enemy unit. However, if there is no way at all of completing the charge against an enemy unit without touching another (sometimes known as 'clipping') then the charging unit must also declare a charge against the other unit(s).
Each target unit must declare and resolve its own charge reaction (in the order chosen by their controlling player). As normal, any units that do not declare charge reactions are assumed to hold.
A unit might well be called upon to make several charge reactions over the course of a Charge sub-phase, if it is charged by several enemy units.
A unit can only Stand and Shoot once in a Charge sub-phase – there is no time to reload. This is not to say that the Stand and Shoot must be used against the first charging unit – the chargee can opt to Hold against the first charge and Stand and Shoot against the second charge. It could even then elect to Flee! in reaction to a third charge if it wished!
A unit that Flees! once in a Charge sub-phase will have to keep fleeing if it has more charges declared against it, as described earlier.
For example, a unit of Night Goblins declares a charge against a unit of High Elf Archers. The Elves could stand and shoot at the Goblins, but think they might well be charged by the Wolf Riders lurking nearby so elect simply to Hold in response to the Night Goblin charge. As it turns out, the Wolf Riders do then declare a charge against the Elves, who take the opportunity to Stand and Shoot against this second charge. Finally, the Orc and Goblin player unleashes his true attack – a charge by a unit of Black Orcs. Having already 'used up' their Stand and Shoot, the Elves declare that they will turn tail and Flee!
Sometimes you'll find that the Flee! rules create unusual situations, for example, a unit running headlong towards the enemy lines, or perhaps fleeing from a small enemy unit and hurling itself into the arms of a much more dangerous foe. This may seem peculiar at first, but is entirely deliberate. Fleeing troops don't have much situational awareness – they're so fixated on the thing that spurred them to flight that they don't recognize other dangers until it's too late.
With all the charge reactions declared and resolved, it's time to see whether or not the charges were successful! There are many factors that can prevent a charge hitting home. The unit might become disordered as it surges forward, with warriors jostling one another in their haste to reach the prey. Perhaps the charging unit is simply unwilling to close with the enemy, and therefore hesitant in their advance. Or it may simply be a loss of momentum as the chargers tire more quickly than it was believed that they would.
Work through the charges one at a time, in any order decided by the player whose turn it is, calculating the charge distance for each and resolving the resultant successful or failed charge before moving on to the next unit (the only exception is when several units charge a single target – see Multiple Charges on a Unit ).
A unit's charge range is equal to 2D6" plus its Movement value. If the charge range is equal to or greater than the distance to the enemy unit, the charge is successful. If the charge range is less than the distance to the enemy, the charge is failed.
As you might expect, the charge range of a unit is based on its Move value – a faster unit can charge further than a slow unit, as is entirely sensible. That said, it is only right that units can charge further than their Move value, as we're assuming them to be going all-out in order to get to grips with the foe. To represent this, as well as the caprices of fate, a unit's charge range is the sum of its Move value and a 2D6 roll in inches or 2D6+M. This can make charges somewhat uncertain at greater distances – just as they would be in real life.
With the unit's charge range established, measure the distance between the charging unit and its target. If the distance is greater than the charge range, then the charging unit realises that if has insufficient momentum to reach the enemy and instead makes what we call a failed charge. If the distance is less than or equal to the charge range, then the charging unit has reached the enemy and makes a successful charge.
If you're charging several enemy units, remember that the rolled charge distance must be sufficient to reach both units, otherwise the charge can only be resolved against those units within range.
A unit that makes a failed charge moves directly towards its target a number of inches equal to the highest dice rolled for the charge.
A unit that makes a failed charge has started towards the enemy, but soon realises that it is impossible to cover the distance. The warriors in the unit lose impetus as the enthusiasm for the charge peters out.
If a unit makes a failed charge it moves directly towards the target a distance equal to the highest score rolled on the 2D6 of the charge roll (i.e. if the dice showed 2 and 5, the failed charge move would be 5"), wheeling around impassable terrain and units, both friends and enemies, by the shortest route.
Sometimes you'll declare a charge thinking that it can be completed, but then discover that proximity of other units, terrain or just whimsical and unkind geometry (by which I mean 'it won't fit') prevents the charge from being completed. In such circumstances, I find it best to treat the charge as having failed, using the rules given earlier. Alternatively, you and your opponent might agree that the sensible thing to do is declare that the charge never actually happened.
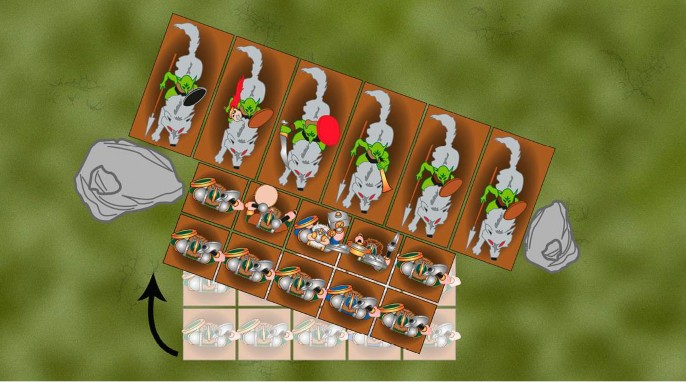
Successful chargers now move into base contact with the enemy. They move directly forward, but are permitted one wheel of up to 90º as they move, and another of unlimited arc once in contact. As many models as possible from the two units must be brought into base contact.
If your charge range was sufficient, it's time to complete the charge and move into base contact with the enemy. A charging unit can move an unlimited amount – it's already been found to be within charge range, so we don't worry about distance from this point on.
That said, the charge move is subject to an important restriction: the unit must move straight ahead, except that, during this move, it may make a single wheel of up to 90º.
You are free to make this wheel in order to place your unit wherever you like against the facing of the enemy unit that is being charged, but remember that you must bring as many models into base contact with the enemy as possible, from both sides! Therefore this wheel cannot be used to reduce the number of models in base contact, unless of course you have no choice, and you need to wheel for the unit to avoid intervening units and impassable terrain in order to complete the charge.
It's important to note that a unit can move to within 1" of another unit when charging – not just the one that it is charging – this is the only time that this is normally allowed.
On most occasions, moving the chargers in the manner described previously will leave the charging unit and the target unit in base contact at a peculiar angle with an odd gap in between, which looks fairly strange. Of course, what would happen in a real battle is that the warriors of the two units would quickly move to attack their enemies and, in so doing, close the gap – so this is exactly what we do in Warhammer.
Once the charging unit contacts the enemy unit, it must perform a second, bonus wheel if required to bring its front facing into flush contact with the facing of the enemy unit that has been charged, maximizing the number of models in base contact on both sides. We refer to this as 'closing the door'.


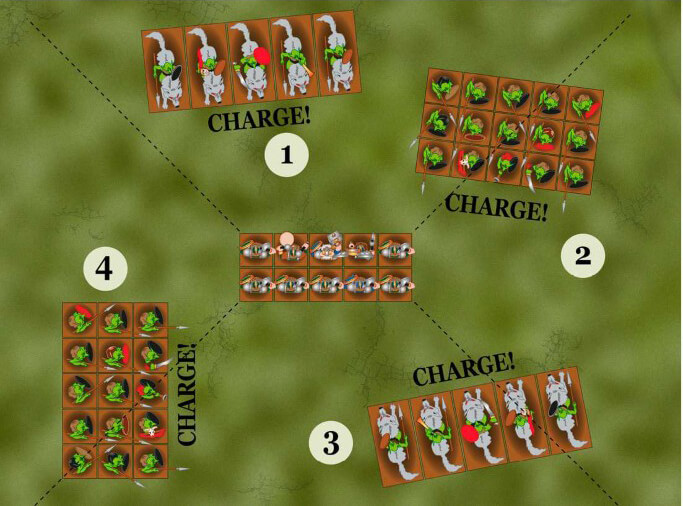
Sometimes you may find that your models are able to charge an enemy unit in the flank or rear. This is particularly good because an attack from an unexpected direction gives you an advantage in combat.
A charging unit's position when the charge is declared determines whether it charges into the front, flank or rear of the enemy unit. If the charging unit is in the target's frontal zone when the charge is declared then it charges into the front.
As units generally begin the game facing each other, this is the most common situation that will arise. However, if the charging unit comes from the flank zone, it charges into the side; if in the rear zone, it charges into the rear. Whether a charger is in the front, flank or rear of its intended target is determined before charges are declared, so make sure you check before charge reactions are declared.
If a charging unit straddles two zones, then the unit is considered to be in the zone where the majority of the models in its front rank are. If there is no clear majority, roll a dice.
Sometimes a charging unit can move into contact with its target, but cannot close the door because something else lies in the way, normally another unit or a piece of terrain. Where this happens, the charging player should attempt to complete the charge in such a manner as to avoid the obstruction. This can normally be achieved by increasing or decreasing the amount the charging unit wheels as it moves, or changing how the charging unit closes the door. In some cases the enemy unit might have to close the door with the chargers instead (see diagram below), as they would do in reality.
If no amount of finagling can allow the unit to avoid the obstacle, the charge fails.
There is one important principle that you should always keep in mind when charging: under no circumstances can a unit use its charge move to move into contact with an enemy it has not declared a charge against.


If, for whatever reason, a unit completes a charge against a fleeing enemy, move the charging unit(s) into contact with the fleeing enemy as described earlier and then the fleeing unit is run down by the chargers. Most of the unit is hacked apart or trampled to death, and the few survivors head for the hills with no intention of fighting further – remove the entire unit as casualties.
A charging unit that destroys fleeing troops in this way will often find itself pulled out of position and vulnerable to enemy counter-charges. Accordingly, we allow the charging unit to attempt a reform by passing a Leadership test. If the test is failed, the troops are so overcome with hacking at the fallen corpses that they do not have the chance to reform. If the test is passed, the unit immediately makes a reform maneuver as described earlier. In either case, the unit cannot move further during this Movement phase.
If several units have declared a charge against a single unit, then roll the charge distance of these units at the same time. The charge moves of the charging units must be made as far as possible to equalize the number of models fighting from each charging unit. Remember, however, that your primary goal is always to maximize the number of models fighting – it is acceptable to have more models fighting from one unit than from another, if to do otherwise would reduce the overall number of models fighting.
On occasion, exceptional dice rolls from charging units might mean that more units can complete the charge than can fit in base contact with the target. When this happens, the controlling player of the charging units must nominate which units complete the charge. Those units that cannot complete the charge against the target are counted as having made a failed charge.
Generally speaking, a player can move his units however he wishes within the confines of the rules governing movement. However, sometimes troops go out of control for some reason, either because they are overcome by sheer terror, because they are compelled by magic, or because they are disorientated (or just not very bright to begin with). The player has no control over the movement of such troops and so these are referred to as compulsory moves.
All compulsory movement is carried out after charges have been resolved, but before other movement takes place.
Fleeing is the most common type of compulsory move – only the luckiest general will not have to witness the unhappy spectacle of his own troops attempting to escape the battle. You must resolve the actions of any fleeing troops before those of other compulsory moves. Happily, before your faithless dogs continue their flight, you have a chance to rally them!
The nature of a game of Warhammer, the varied terrain it is fought over and the stability of the models themselves means that it is impossible to be absolutely accurate about the movement of troops – the odd fraction of an inch will inevitably appear or disappear as lines are neatened and models edged together. On the whole, this need not cause concern during play as it is better to keep the game flowing rather than worrying about unavoidable imprecision. Where a move is especially important or an exact measurement is critical, it is good practice to agree what you are doing with your opponent before moving any troops.
The player takes Leadership tests for each fleeing unit he has. If the test is passed, the unit stops fleeing and immediately reforms. A unit that has 25% or less of its starting models left can only rally on a roll of double 1.
Battlefields are grim and deadly places, where the threat of death (or a fate worse than death!) forever lurks. As the game goes on, some of your warriors will inevitably lose heart or be terrified out of their wits by the unremitting carnage all around them. It is a fortunate general who can rely on his men to press on through thick and thin, no matter what horrors the day brings. All too often, warriors will break from the fight and flee the battle, electing for a chance of survival over martial duty. Fortunately for you, during the Compulsory Moves sub-phase you are allowed a chance to whip some discipline into these cowardly curs and get them back into the fight, where they belong.
During the Compulsory Moves sub-phase, the player picks any one of his fleeing units and tests to rally it (as explained below). He then proceeds to the next fleeing unit and attempts to rally it, and so on, in any order he wishes, until all units that are able to make a rally attempt have done so.
If the unit started to flee in this turn it cannot attempt to rally – there's too much momentum built up already!
A unit attempts to rally by taking a Leadership test (as described in General Principles). If the fleeing unit has been reduced in size to a quarter (25%) or less of the number of models with which it began the game, it can only pass its Rally test on a double 1, regardless of its Leadership value (the survivors are too demoralized to give all but the scantest consideration to rallying).
If the Rally test is failed the unit continues to flee, as described below.
If the Rally test is successful, the unit stops fleeing. Order is restored as chieftains, champions and leaders bash a few heads together, or manage to bellow a few well-chosen motivational words (or bare-faced threats) over the thunder of running feet. Whilst the unit is not yet ready to rejoin the fight, it will be able to make some very basic maneuvers and will be fully fighting fit in time for your next turn. You may like to mark freshly rallied units with a coin or counter of some description, so you don't get them confused with other troops.
A unit that has successfully rallied immediately makes a reform maneuver (as described earlier), so that the controlling player can at least get his troops pointed towards the enemy again, rather than the wild blue yonder. A rallied unit cannot perform further actions during the Movement phase, and loses its opportunity to make a shooting attack in the Shooting phase, as the troops are too busy reorganizing themselves after their headlong flight.
Any units that do not rally must immediately flee 2D6" in the direction they are facing. Every model that flees through an enemy unit or impassable terrain must take a Dangerous Terrain test.
If, despite the player's best efforts, a unit continues to flee, it will continue its headlong flight for safety, moving 2D6" straight ahead in the direction it is facing. Some particularly swift units flee faster, but we'll discuss those later on.
As fleeing troops are assumed to have broken formation, they ignore obstacles of any kind as they retreat. Fleeing troops move through other units (friend or foe) and impassable terrain, as they are assumed to run around the obstruction, or force their way through, fuelled as they are by sheer desperation. If the flee move would result in the fleeing unit ending up 'on top' of or within 1" of another unit or impassable terrain, then it carries on fleeing straight forward until it is past the obstruction, and will then halt.
Fleeing through enemies or impassable terrain is not without its dangers. Enemies may be quick-witted enough to capture or slay several of the fleeing troops as they run past, while the sheer drops, deep water and dense undergrowth of impassable terrain present all kinds of hazards to a warrior more concerned about what he is running from than what he is running into. Accordingly, each fleeing model must pass a Dangerous Terrain test for each enemy unit or area of impassable terrain that it flees through. More information on Dangerous Terrain tests and impassable terrain can be found in the Battlefield Terrain chapter.
There are consequences for a unit fleeing through friends as well – having allies stream past you in a panicked state is not conducive to maintaining your confidence in victory, after all! Any unit that has friends flee through it must take a Panic test (as described in the Panic chapter), as soon as the fleeing unit has completed its move.
As soon as a fleeing unit moves into base contact with the battlefield edge, it flees the battle and does not return – we assume that its warriors scatter to the four winds. Such a unit counts as destroyed to all intents and, more importantly, all rules purposes.

Aside from fleeing troops, units that are forced to move in the Compulsory Moves sub-phase otherwise follow the normal movement rules, unless clearly stated. Any further rules that apply to units that have a compulsory move will be described in their entry in the relevant army book, for example, they will often have to move at a set speed or in a given direction. These compulsory moves can be resolved in any order the controlling player wishes, providing that all flee moves have already been completed.
With all your charges and compulsory moves attended to, you can now move the rest of your army. While it might lack the drama of the charge, the remaining moves sub-phase is no less important. It is here that you'll manoeuvre your units in order to set up your own charges of future turns, as well as attempt to deny future charges your opponent will wish to make. Remaining moves can also be used to manoeuvre missile troops and wizards so that they have suitable targets, seize important areas of the battlefield, and so on…
During the Remaining Moves sub-phase, units that did not charge, flee, rally or compulsorily move this Movement phase, and which are not engaged in combat, can now move and perform maneuvers (as described earlier).
The player picks one of his units and moves it a distance up to the unit's Move value (M) in inches. Once the chosen unit has finished its movement, the player can pick and move another unit, until all the eligible units the player wishes to move have done so.
Units can not only move forward, they can also move backwards. Moving backwards is a tricky proposition, and warriors tend to shuffle carefully rather than stride purposefully when moving backwards. To represent this, a unit that moves backwards moves at half rate, i.e. it counts the distance moved as being double what it actually is.
To get a body of warriors to move to either flank is no small challenge, especially if you want to maintain a viable fighting formation (as you do). To represent this, a unit that moves sideways moves at half rate, i.e. it counts the distance moved as being double what it actually is.
Units may not mix forward, backward and/or sideways movement as part of the same move. Remember that units can only wheel when moving forwards.
For example, a unit of Elves (Move 5) would be able to move 5" forwards or 3" (2.5" rounded up) backwards or to the side.
Troops can move at double speed. If they start their move within 8" of an enemy, they must pass a Leadership test to do so.
Marching at the double allows troops that are away from the heart of the battle to move more rapidly. This represents the swift movement of reserves to a critical area by means of a rapid march and helps to ensure that units do not get stranded away from the fighting.
Marching troops move at twice their normal Movement rate, with weapons sheathed or shouldered. They are literally 'going at the double'. A unit on the march is not permitted to reform, as this would disrupt its movement, nor is it allowed to move backwards or to the side. It can wheel as normal, as you might imagine a column of troops would in order to follow a road, for example.
It's also worth noting that a unit that has marched in the Movement phase cannot shoot missile weapons during the Shooting phase, so think carefully before you commit your missile troops to a march.
A unit that is on the march is not prepared for combat, so troops are reluctant to march whilst a potentially threatening enemy is nearby. If you wish a unit to march when a non-fleeing enemy unit is within 8", it will first have to take a Leadership test. If the test is passed, the unit disregards the nearby foe and marches as ordered. If the test is failed, the unit refuses to march and will only be able to move normally. Note that if a unit attempts an Enemy Sighted! test and fails, it is still treated as having marched, even if its controlling player then elects not to have the unit move at all.
Units that consist of a single model, such as monsters, chariots, lone characters or sole survivors of annihilated units, are mostly moved the same as other units.
They move, wheel and march just like a larger unit. The one exception is that a single model can pivot on the spot as many times as it wishes over the course of its move. It can do so without penalty and so pivoting does not prevent models from marching, or even from shooting later in the turn. This represents the greater freedom of movement that an individual creature enjoys over its fellows in a ranked-up and disciplined unit; although a lone model that pivots on the spot does count as moving for the purposes of shooting and so on.
On some occasions, notably when charging, a lone model has to perform a wheel (when charging, a lone model must follow the normal charge rules, which do not allow pivots, only one wheel whilst moving, and another to 'close the door'). In this case, wheel from one of the front corners as you would for other units.
Except in the case of fleeing troops (as discussed earlier) and pursuing troops (see the Close Combat Phase) units are not permitted to move off the board.
Sometimes the rules will call for a unit to enter the battle. Where this happens, we refer to the unit entering play as reinforcements.
Units that enter the battle (also referred to as moving onto the board) as reinforcements are placed in base contact with the board edge (upon which board edge, and where, will depend upon the rule that triggers the reinforcements) facing directly towards the battlefield and with all of its rear rank touching the battlefield edge.
A unit that enters as reinforcements cannot charge, as it has missed its opportunity to declare charges, and may not march, but can otherwise participate in the game normally. It's worth bearing in mind that the unit counts as having moved for the purposes of shooting. In addition, all the models in the unit must be set up so that they are within twice their Movement rate of the battlefield edge that they entered from.
The Warhammer world is an intrinsically magical place, where mystical energy infuses the very land itself. In battle, magic is a force as real and potent as a sword blade. The battlefield use of magic is limited only by the imagination and skill of the Wizard that wields it. Magic can be a subtle force, infusing allies with strength and valour, and enemies with frailty and dread. More commonly though, wizards unshackle the raw power that is at the heart of magic’s chaotic nature, summoning hungry firestorms or devastating bolts of eldritch power.
With the Movement phase completed, it’s time for your Wizards to unleash their powerful sorceries. You’ll find that the Magic phase taps into some of the rules detailed later in the book, so if you’re not yet familiar with much of Warhammer be prepared to do a little flicking back and forth as you read through this chapter. As with everything in Warhammer, the more you play, the more you’ll remember without having to constantly refer to the rulebook.
Models that can cast spells are known collectively as Wizards, although specific armies might use other terms.
Before we get into discussing the Magic phase proper, it's worth taking a little time to introduce the idea of Wizards and their spells. Only beings that possess awesome mental might can even hope to bend the powers of magic to their will. Lesser persons would be consumed in an instant, their souls torn apart by unfettered energies or devoured by cackling Daemons. Even the most accomplished of sorcerers walk a narrow path at the edge of sanity, between ultimate power and total annihilation. In Warhammer, we commonly refer to a model able to cast spells as a Wizard. Some races use different terms, such as sorcerer, shaman or seer, but all of these and others are considered to be types of Wizard.
Wizards have a level from 1 to 4. The higher a Wizard's level, the more powerful he is.
Naturally, not all Wizards are equals – mastery of magic increases through dedicated practice. As one might expect, a thousand-year-old High Elf mage will likely have more magical power in his little finger than an upstart acolyte of one of the Imperial Colleges of Magic has in his entire body. We need a system for sorting between these levels of wizardly potency, and that system is the Wizard level.
The higher a model's Wizard level, the more accomplished a spellcaster he is. A higher-level Wizard will know more spells than a lower-level Wizard. Similarly, he'll be able to put more power behind his spells and receive higher bonuses when attempting to cast them. There are four Wizard levels, each more powerful and learned than the next. If you're unsure what level any of your Wizards are, refer to the relevant Warhammer army book for details.
Each Wizard knows a number of spells equal to his level, chosen randomly at the start of each battle.
In the Magic phase your Wizards unleash their magical power in the form of spells. Spells can be terribly destructive or powerfully protective, or might confer special abilities of some form.
Wizards are assumed to know dozens of different spells, or even hundreds, from complicated time- consuming rituals to party tricks, charms and minor alchemies. However, when it comes to a battle only a limited selection of magic is of any value.
The number of spells a Wizard takes into battle is equal to his Wizard level. Some powerful Wizards have more, but this is most definitely the exception to the rule. You must roll for each of your Wizards' spells before they are deployed to the battlefield – see the Reference section.
The Lores of Magic are lists from which Wizards generate their spells. Different Wizards have access to different Lores of Magic. The eight most common lores are presented in the Reference section.
As has already been hinted at, the possible applications of magic are many and varied, leading to a potentially vast array of spells to choose from. Fortunately for our gaming convenience (to say nothing of our already tenuous sanity) very few Wizards in the Warhammer world have the gumption to harness the full spectrum of magic, and instead concentrate on mastering one or more magical disciplines, or lores.
There are many magical lores. Most represent fragments of 'pure' magic as practiced by the High Elves.
Each lore has a particular character, which is reflected by each spell within it. The Lore of Metal, for example, is grounded in alchemy, and its spells therefore act through the transmutation of one substance into another. The eight most common lores, echoing the eight disciplines that the High Elves once taught to men, are collated at the back of this book. Almost all races can use one or more of these lores, depending on the character of said race, and its magical methods. Many races also have access to their own, unique spell lores, such as the fearsomely destructive Waaagh! magic of the Orcs and Goblins. Where this is the case, the relevant Warhammer army book will contain the necessary spell list(s).
The choice of which lore each of your Wizard models know for a particular battle must be made when choosing your army (as explained in the Choosing Your Army chapter).
Now we've established the basic principles of Wizards and their spells, it's time to dive into the Magic phase. The Magic phase starts with both sides determining how much magical power can be tapped into this turn. The player whose turn it is (the casting player) will be seeking to draw down enough power to cast his spells, whilst his opponent (the dispelling player) will be gathering magical energy to dispel any spells being cast.
Roll 2D6 to determine the strength of the Winds of Magic.
At the start of each Magic phase, the casting player determines the strength of the Winds of Magic by rolling 2D6.
The amount of power available to the casting player is equal to the total rolled for the Winds of Magic.
He takes a number of dice equal to the Winds of Magic roll and makes up a 'pool' of power dice to represent this reservoir of power. When a Wizard casts a spell, he takes a number of dice from the power pool in order to make the attempt. Accordingly, each time a spell is cast, the power pool will shrink a little, thus limiting the number of spells the casting player can attempt each Magic phase.
The casting player rolls a D6 for each of his Wizards. An extra dice is added to the power pool for each roll of a 6.
Whilst a Wizard cannot control the amount of power present in the Winds of Magic, he may be able to channel what power there is and make it go further. To represent this, the casting player rolls a D6 for each Wizard in his army. For each result of a 6, the Wizard has been able to siphon a little more power from the Winds of Magic – he generates another power dice, which is immediately added to the power pool. Fleeing Wizards and Wizards that are not on the battlefield (for whatever reason) are not able to channel. Fleeing Wizards are considered to be too busy to attempt to channel, whilst absent Wizards are too far away to contribute.
There is a finite limit on the amount of power a Wizard can control. The casting player's power pool can never exceed 12 dice at any point in the phase – any dice generated beyond this number are lost.
This limit applies to all power dice, regardless of the source, and includes dice gained through the Winds of Magic, channelling, from magic items, special abilities and so on.
The dispelling player gets a number of dispel dice equal to the highest D6 roll of the two Winds of Magic dice.
With the power pool determined, the dispelling player now determines what resources he has at his disposal with which to counter his enemy's spells. By its very nature, disrupting magic energy is far more difficult than harnessing it, so a player's dispel pool will almost always be smaller than his opposite number's power pool. The number of dispel dice available to the dispelling player is equal to the highest D6 rolled for the Winds of Magic. So, for example, if the Winds of Magic dice are rolled and show a 2 and a 6 the casting player will get 8 power dice (the total) and the dispelling player will get 6 dispel dice (the highest value shown). These dice are then placed in a dispel 'pool' in a similar manner to power dice. Each time a Wizard attempts a dispel, he takes dice from the dispel pool to do so.
Extra dispel dice can be generated in exactly the same way as power dice.
The dispelling player's Wizards can now attempt to channel further dispel dice into their pool. Roll a D6 for each Wizard. For each roll of a 6, add an extra dispel dice to the pool. Again, as when channelling power dice, fleeing Wizards and Wizards not present on the battlefield cannot attempt to channel dispel dice.
As with the power pool, the number of dice in the dispel pool can never exceed twelve, regardless of how those dice are generated. Any excess is lost.
For example: It's the start of the Magic phase, and the casting player rolls to generate the Winds of Magic. He rolls his 2D6 and scores a 3 and a 5. The casting player therefore adds a total of 8 (3+5) power dice to his pool, whilst the dispelling player adds 5 dispel dice to his pool. Furthermore, both players can have their Wizards attempt to channel. The casting player has 3 Wizards, so can roll 3 dice in his channelling attempts. Alas, he doesn't roll any 6s, so gains no extra dice. The dispelling player has only 1 Wizard, so rolls a single dice, but gets a 6, increasing his dispel pool by 1 to an impressive 6 dice!
The casting player's Wizards can attempt to cast each of their spells once during each Magic phase, provided they have enough power and don't fail a casting attempt.
Each Wizard can only attempt to cast each spell once per turn. Wizards cannot try to cast spells if they are fleeing or not on the battlefield.
To cast a spell, a Wizard nominates one of his spells to cast, and declares the target of the spell. Before choosing, it's worth examining the rules of the spell to determine its maximum range – remember that you can normally measure to see if a target is in range before you try to cast a spell. Spells also have targeting limitations, as we'll discuss now.
Targeting restrictions vary from spell to spell. However, unless stated otherwise the following rules apply:
Some spells have a type that enforces additional casting restrictions, or waives others. There are five distinct types of spell: augment, direct damage, hex, magic missile and magical vortex. Some unique spells, or spells that are printed in older Warhammer army books, do not have a type – their text will contain any casting restrictions that apply.
Direct damage spells are deadly attacks that strike the foe without warning. Direct damage spells can only ever be cast on enemy units. Sometimes a direct damage spell will use a template to determine which models are hit. When this happens, the template cannot be placed in such a way that it touches friendly units or enemy units that are in close combat – this is not to say that the template won't scatter onto friends later, depending on the spell.
Magic missiles are sorcerous projectiles that the Wizard hurls at his foe. Magic missiles can only be cast on enemy units. Unlike other types of spells, magic missiles do require the Wizard to be able to see his target. Accordingly, a Wizard can only cast a magic missile at a target that lies within his forward arc and to which he can trace line of sight (just as if the wizard was firing a missile weapon). Magic missiles cannot be cast at all if the Wizard (or his unit) is engaged in close combat. Magic missiles always hit their target automatically.
Augment spells empower the caster's allies, protecting them with sorcerous wards and magically enhancing their fighting prowess. Augment spells can never be cast on enemy units, no matter what benefit the player believes he might get. Augment spells can even be cast onto units in close combat to give them a much-needed boost. Also, targets of augment spells need not lie in the the caster's forward arc.
Hex spells are the counterpoint to augment spells, weakening the enemy and making them easier to slay. Hex spells can only ever be cast on enemy units. Hexes can be cast onto units in close combat. Targets of hex spells need not lie in the the caster's forward arc.
Note that bonuses and penalties from Hex, Augment and other spells are cumulative, but normally cannot take any characteristics above 10 or below 1.
Magical vortexes are roiling globes of magical energy that travel across the battlefield, wreaking all kinds of unusual (and often deadly) effects. A magical vortex does not have a target – instead it uses one of the round templates, which is placed in base contact with the caster and with its centre within the caster's front arc, and then moves as described in the spell.
Unlike most other spells and other gaming effects that use templates in Warhammer, magical vortexes remain on the battlefield (unless they move off it). At the end of every subsequent Magic phase, each magical vortex moves in the direction and distance stated in the spell. If a magical vortex ever ends its move over a unit, place it 1" beyond the unit in the direction it was moving. Magical vortexes are always remains in play spells (see Spell Duration, below).
When choosing a spell's target, remember that lone models are units in and of themselves, and therefore legitimate targets for many spells.
When casting a spell, a Wizard can use from one to six power dice.
Once the Wizard, spell and target have been chosen, the player then declares how many power dice from his pool the Wizard will use in his attempt to cast the spell. At least one dice must be taken from the power pool, and a maximum of six dice can be used on each spell.
For a spell to be cast, the total of the dice rolled, added to the Wizard's level, must equal or beat the spell's casting value.
The chosen dice are then taken from the casting player's power pool and rolled. The results are added together, and then added to the casting Wizard's level to give a casting result. So, if a level 4 Wizard attempts to cast a spell with three dice, rolling 1, 3 and 6, the total casting result would be 14 (1+3+6=10 for the power dice roll, added to 4 for the Wizard's level). Keep the dice in front of you for the moment – you'll need the scores if your opponent attempts a dispel, as we'll discuss later.
Each spell has an associated casting value, any number from 3 upwards. Spells with a higher casting value have greater effect, but require more power.
If the casting result equals or exceeds the spell's casting value, the spell is cast (though it may be subsequently dispelled and neutralised by the opposing player, as we'll discuss later).
If the result is less than the casting value, the casting attempt has failed. The spell is not cast.
For example, a Level 2 Empire Bright Wizard is attempting to cast Fulminating Flame Cage from the Lore of Fire. Fulminating Flame Cage has a casting value of 11+, so the Wizard needs to score a total of 11 or more.
With this in mind, the Wizard's controlling player decides to roll three dice in the attempt to cast the spell, and scores 2+4+4 (for a total of 10). This in itself is not enough to cast the spell, but by the time the Wizard's level is added, it gives a total of 12 (the 10 rolled on the dice plus 2). The spell is therefore cast!
Some spells allow the Wizard the option to focus more magical force into their casting, thus extending the effective range, amount of damage caused or area of effect. Where this is an option, it is clearly stated in the spell's effect, as is the extra casting cost required to achieve the additional effect.
Note that if the controlling player does not state otherwise before rolling the dice, a Wizard is assumed to be casting the standard (and therefore less difficult to cast) version of the spell, so be sure to let your opponent know if you're going to attempt a boosted version!
For example, the aforementioned Empire Bright Wizard could have cast Fulminating Flame Cage at a higher level, increasing its range from 24" to 48", but increasing its casting value from 11+ to 14+. If he had wished to do so, his controlling player would have had to declare this intention before the dice were rolled.
No matter how powerful a Wizard might be, he cannot cast a spell where the total of the natural dice scores is less than 3. A dice total of 1 or 2 is always considered to be a failure, despite the level of the Wizard. This is true regardless of any bonuses, from any source. Even the mightiest and most learned Wizard needs to coax a certain amount of raw power out of the Winds of Magic in order to cast a spell.
If a Wizard fails to equal a spell's casting value, or the total of the natural dice scores is 1 or 2, not only is the spell not cast, but the Wizard breaks his concentration and is unable to cast spells for the rest of the Magic phase.
For example, a Level 4 Wizard attempts to cast The Flock of Doom (casting value 5+). Assuming that his innate magical ability (the +4 bonus for being a Level 4 Wizard) is sufficient to ensure that the spell is cast, the controlling player chooses to use a single D6 in the casting attempt. Alas, the dice scores a 2 and, even though the casting total (2+4=6) is higher than the spell's casting value (5+), the spell fails. The Wizard will not be able to cast any further spells that turn.
If two or more 6s are rolled when casting a spell, it has been cast with irresistible force. The spell will be cast automatically and cannot be dispelled, but the Wizard has to roll on the Miscast table when the spell has been resolved.
Magic is fickle, and writhes like a thing alive even whilst a Wizard shapes it to his will. Magic always strives to be free of constraint, and should the Wizard mispronounce a single word, or otherwise miscast the spell, the magic will shatter its bindings in a burst of incredible energy. Wizards can therefore be described as not trying to empower their spells, but to hold that same energy in check lest it prove to be their undoing.
If a Wizard rolls two or more unmodified 6s when determining his casting result, the spell has been cast with irresistible force. When seeing if irresistible force has occurred, always use the actual dice scores, irrespective of bonuses from special rules or magic items. If a Wizard is called upon to re-roll the dice for any reason, it is the second result that stands, as is normal for a re-roll.
All dice rolled count towards irresistible force, regardless of whether the dice were power pool dice, or granted as a bonus from a special rule or magic item.
For example, a Level 1 Wizard attempts to cast the formidable Life magic spell, The Dwellers Below (casting value 18+) and rolls four dice, scoring 1, 2, 6 and 6 (for a casting total of 15+1 for the Wizard's level). As two 6s were rolled in the casting attempt, the spell is cast with irresistible force – it doesn't matter that the casting total is lower than the spell's casting value.
On the one hand, irresistible force is a good thing, because the unshackling of power ensures that the uncontained raw magic pulses through the Wizard's spell and empowers it in such a manner that it cannot be prevented.
A spell cast with irresistible force automatically succeeds, even if the casting total is not enough to reach the spell's casting value. More importantly, perhaps, a spell cast with irresistible force is impossible to dispel – your opponent cannot even attempt to prevent the magical mayhem soon to be unleashed – go straight to Step 4, Spell Resolution.
However, irresistible force is also a very bad thing indeed. When irresistible force occurs, the wildly arcing magic inevitably proves dangerous to the Wizard and to anyone nearby. Naturally, the Wizard will do his best to contain the uncontrollable energy, but success is by no means guaranteed – this is what we refer to in rules terms as a miscast.
When irresistible force occurs, first resolve the effect of the spell that the Wizard was attempting to cast. As the spell has been cast with irresistible force, the casting player can at least enjoy the effect of his spell before something almost indescribably bad happens to the Wizard and everyone nearby.
Once the effect of the spell has been resolved, the Wizard now needs to roll 2D6 on the Miscast table to see what happens to him.
You'll notice that many of the results on the Miscast table call for damage (in the shape of automatic hits) to be caused upon the Wizard or nearby models. Though we've yet to talk about how damage is worked out, you'll find all the information you need in step 4 of the Shooting phase.
Our Wizard from the previous example has presumably wrought significant destruction on the enemy with his irresistibly cast The Dwellers Below. However, it's now time to pay the piper. As the spell was cast with irresistible force it was also miscast, and the Wizard must roll on the Miscast table to discover his fate. He rolls 2D6 on the Miscast table and scores a 7, resulting in a Detonation! result. As a result, all models in base contact with the Wizard suffer a Strength 10 hit and D6 dice are lost from the power pool. Painful, but it could have been much worse for the Wizard!
Note that some magic items and special rules talk of automatically triggering a miscast or irresistible force. This is the only occasion on which one can be had without the other.
So, for example, a magic item that caused a Wizard to miscast automatically would force that Wizard to roll on the Miscast table, but the spell would not be cast with irresistible force.
Similarly, an item that automatically generates irresistible force would not require a roll on the Miscast table.
Dimensional Cascade: The summoned magics wrench free of the Wizard's control, laying waste to anyone unfortunate enough to be nearby. Centre the large round template over the Wizard – every model underneath the template (including the hapless Wizard – he is not entitled to a Look Out Sir! roll in this case) suffers a Strength 10 hit. Once the damage has been resolved, roll a D6. On the score of 3 or less, the Wizard is cast into the Realm of Chaos – remove him as a casualty. On a roll of 4-6, D6 dice are lost from the power pool instead.
Calamitous Detonation: In his battle to contain the roiling energies, the Wizard somehow manages to make the situation worse, feeding more power into what promises to be a devastating explosion. Centre the small round template over the Wizard – every model underneath the template suffers a Strength 10 hit (including the foolish Wizard – note that he is not entitled to a Look Out Sir! in this case). Additionally, D6 dice are lost from the power pool.
Detonation! The energy explodes without warning! All models in base contact with the Wizard (friend and foe, but not the Wizard himself) suffer a Strength 10 hit. Additionally, D6 dice are lost from the power pool.
Magical Feedback: The Wizard disperses the excess magical energy, but the resulting feedback leaves him unable to harness the Winds of Magic for a time. The Wizard and every model on the same side that can channel/generate power or dispel dice suffer a Strength 6 hit as a result of the magical backlash. Additionally, D6 dice are lost from the power pool.
Power Drain: Through a combination of luck and skill, the Wizard manages to dissipate most of the spell's excess energy, leaving him with a splitting headache and pervading amnesia. His Wizard level is permanently reduced by D3, to a minimum of 0 and he forgets a single spell for each Wizard level lost (the first is always the spell that was just miscast – other spells lost are determined randomly). The Wizard cannot attempt to cast further spells this phase.
If the Wizard was able to cast his spell (and it was not cast with irresistible force) the opposing player now has a chance to prevent the spell's effects by attempting to dispel it.
In order to attempt a dispel, the dispelling player first nominates one of his Wizards to make the dispel attempt. Unlike spells, dispels do not have a range and never require the Wizard to see either the target or the caster – you can simply nominate any Wizard on the battlefield.
If the dispelling player does not have an eligible Wizard to attempt a dispel (or simply does not want one of his Wizards to make the attempt) his army can attempt to dispel the spell instead.
When dispelling, a Wizard can use any number of dispel dice.
Once the Wizard has been chosen, the player declares how many dispel dice the Wizard will use in his dispel attempt. Unlike casting, there is no upper limit on the number of dice that can be used in a dispel attempt – though you must use at least one dice from the pool if you wish to attempt a dispel.
Dwarfs turned away from spellcraft long ago. As a result of this, there are no Dwarf Wizards, but their race has become highly resistant to magic.
Accordingly, when a Dwarf army attempts to dispel, the innate magic resistance of the Dwarfs grants the army a +2 bonus to all dispel attempts. Note that if the Dwarfs are fighting alongside a Wizard (either in the same army, or as part of an allied force) for whatever reason, this bonus is lost – the Wizard's presence disrupts the Dwarfs' natural resistance.
For a dispel to succeed, the total of the dice rolled, added to the Wizard's level, must equal or beat the spell's casting result.
The number of dice chosen are taken from the player's dispel pool and rolled. The results are added together, and then added to the Wizard's level to give a dispel result, exactly as if he were casting a spell. If the army is attempting the dispel, no bonus is added to the total.
If the dispel result equals or exceeds the spell's casting result, the dispel is successful and the spell does not take effect. For example, if the caster scored a casting result of 15, the dispelling Wizard would need to score a result of 15 or more to make a successful dispel.
If the result is less than the spell's casting result, the dispel attempt has failed. Furthermore, the Wizard is so preoccupied by his collapsing dispel that he isunable to attempt another later in the phase. Just as when casting a spell, a total natural dice score of 1 or 2 is always considered to be a failure, despite any modifiers. This is true regardless of bonuses, from any source. Note that the army can always attempt to dispel, regardless of previous failures.
For example, a Level 3 Wizard is attempting to dispel an enemy casting of The Purple Sun of Xereus. Fortunately, the spell was not cast with irresistible force, but with a casting total of 23, so a dispel attempt can be made. The dispelling Wizard rolls six dice, scoring 1, 3, 4, 4, 5 and 6. Added to his Wizard level, this yields a dispel value of 26, higher than the 23 required, so the dispel is successful and the spell does not take effect.
If two or more 6s are rolled in a dispel attempt, the spell is dispelled automatically.
If two or more unmodified 6s are rolled when making the dispel attempt, the dispel is granted irresistible force and succeeds automatically, regardless of whether or not it beats the casting result of the spell (although it still cannot help if the spell was cast with irresistible force in the first place). If a player is called upon to re-roll the dice for any reason, it is the second result that stands, as is normal for a re-roll. Note that a dispel that achieves irresistible force does not cause a miscast roll.
Follow the instructions in the spell's text.
If the enemy has failed his dispel attempt (or not even attempted one!), the spell is cast successfully and its effect is now resolved. Each spell in Warhammer provides all the information you need. Many spells inflict hits or wounds on your enemies – you can find out how to resolve these in the Shooting phase chapter.
Remember that if your spell was cast with irresistible force, you'll need to go back and resolve the result of the miscast as soon as you've finished resolving your spell effect.
Quite a lot of spells inflict damage in one manner or another and, as with shooting attacks, if enough damage is caused, can cause the enemy to flee from battle. Damage from magic can provoke Panic tests, as described in the Panic chapter.
Most spells are cast instantly and their effect is worked out at once. In this case, the spell has no further effect in the game until cast again. Some spells last for longer than this, for one or more phases, or turns.
Spells marked 'remains in play' stay in effect indefinitely when cast. They only come to an end when the target is slain, or else the caster is slain, chooses to end the spell (which he can do at any time, except for magical vortexes, which he can only choose to end at the start of a phase) or leaves the battlefield. The Wizard can continue to cast other spells (but not the same remains in play spell in subsequent turns) as he requires only a little concentration to keep a remains in play spell going. If they are not dispelled immediately when they are cast, remains in play spells can be dispelled at any point during a subsequent Magic phase, using dispel dice as normal, or dice from the power pool as if they were dispel dice if it is your turn.
Remains in play spells do not retain the energy of their casting, and so a Wizard does not need to beat the original casting dice roll if attempting a dispel in subsequent turns, but rather the minimum casting value listed in the spell's description (so there is no need to make note of each spell's casting roll). For this reason, remains in play spells cast with irresistible force can be dispelled as normal in subsequent turns A Wizard who fails to dispel a remains in play spell during his own or the enemy Magic phase, cannot attempt further dispel or casting attempts for the remainder of the phase.
Some spells do not specifically remain in play, but have effects that last one or more turns. Once in play, such spells cannot be dispelled, and remain in effect even if the caster is slain or leaves the battlefield, unless the spell description specifies otherwise.
With the spell resolved, the casting player can now have the same or another of his Wizards attempt to cast another spell.
Wizards can cast spells in any order, and a player is free to switch between Wizards at any time provided that he does not do so until the casting of the current spell has been resolved.
Remember that, unless specified otherwise, each Wizard can cast each spell only once per turn. When the casting player has finished all his casting and dispelling attempts, either because he has run out of power dice or has no remaining or useful spells to cast (or if all his Wizards have had their concentration broken by failing to cast a spell) the Magic phase ends, and the Shooting phase begins.
Some magic items, often rings and amulets, and certain troop types, have the ability to use a form of magic called a 'bound spell'. Bound spells can be used even if the bearer has broken his concentration or is not a Wizard at all. Possessing a bound spell does not make a character a Wizard – he just has an item that can cast a spell.
A bound spell is cast just like an ordinary spell – using dice from the power pool (the model may do so even if it is not a Wizard). The required casting value is equal to the bound spell's power level. Note that bound spells never benefit from any casting modifiers that the user might have (for Wizard level, magic items, and so forth). On the other hand, failing to cast a bound spell does not break a wizard's concentration, as using an item that contains a bound spell normally would not require anything more complex than uttering a single word of activation.
For example, a High Elf Noble has the Ruby Ring of Ruin, a magic item that contains the lowest level of Fireball as a bound spell of power level 3. Therefore, when the Noble attempts to cast the spell, the casting roll must be equal to or greater than 3. If the Ruby Ring of Ruin was instead borne by a Level 2 High Elf Mage, he too would need the casting roll to be equal to or greater than 3 – he cannot use his +2 level bonus to boost the score.
As in the example above, bound spells are often tied into a spell from a magic lore. Where this is the case and there is a choice of casting levels, the bound spell is always the easier 'unboosted' version with the lower casting level.
Bound spells are dispelled exactly as other spells – the dispelling Wizard must equal or beat the casting result for a successful dispel.
A bound spell can be cast with irresistible force, just as a normal spell, by rolling two natural 6s in the casting roll. The bound spell is then cast automatically, and cannot be dispelled (but, of course, causes a miscast).
What happens when a bound spell is miscast depends on the nature of the bound spell.
During the Shooting phase, your army lets fly with the missile weapons at its disposal, be they bows, cannons or fantastical war machines. Most armies will have a unit or two of archers, crossbowmen or mighty war machines, and use these missile units to thin the enemy ranks before the bloody press of melee begins in later turns. Other armies will field masses and masses of missile units, intending to seize victory in the Shooting phase by obliterating the enemy at long range.
This chapter covers the shooting rules for common weapons and the majority of troop types. War machines and other, more peculiar, devices of destruction are covered in their own chapter. However, even the most colossal trebuchet is governed by many of the same rules as the humble bow and arrow, so it’s worth reading through this chapter before unlimbering your cannon or organ gun.
Nominate one of your units that you want to shoot with and select one enemy unit you wish your unit to shoot at. Once you have declared your target, resolve shooting using the rules described.
Then proceed to the next unit that is shooting and continue as above until you have shot with everything able to do so.
During the Shooting phase, a model armed with a missile weapon can use it to make a single shooting attack. Models that have marched, reformed or rallied this turn cannot shoot, nor can those that have made a failed charge, are fleeing or are fighting in close combat.
To launch a successful shooting attack requires a degree of preparation as most weapons take a long time to load or aim. As a result, a model that wishes to make a shooting attack must have had a relatively uneventful Movement phase. The most common reasons a model cannot shoot are:
This is, of course, not a comprehensive list. Other situations will doubtless arise, due to spell effects, army special rules and other factors. Fear not! These will be explained by the relevant rule as and when they occur
A model can shoot at an unengaged enemy unit that is at least partially within its forward arc, and to which it has an unblocked line of sight. The enemy must also lie within range of the weapon being used.
Now you've chosen the unit that will make the shooting attack, you need to choose a target for it to shoot at. All models in the same unit must shoot at the same target, so choose carefully.
As you might expect, to shoot at an enemy your warriors need to be able to see it. We use two straightforward rules to determine whether or not an enemy can be seen. Firstly, the target enemy unit must lie at least partially within the shooting model's forward arc, just as it would if your shooting model wished to declare a charge (if you need to refresh your memory about forward arcs, see Unit Facing, earlier).
Secondly, the shooting model must be able to trace a line of sight to the target (information on line of sight can be found in General Principles, earlier).
The rules given so far allow front rank models to shoot, but we also want to allow models in the second rank to shoot (they take aim over crouched or stooping fellows in the front rank). Therefore, models in the second rank can use the line of sight and forward arc of the model directly in front of them for the purposes of all shooting attacks (including stand and shoot reactions). In simple terms, this allows units to fire in two ranks.
Models further back than the second rank of a unit are assumed to have their line of sight blocked by models further forward, and so will not normally be able to shoot.
As with any other attack, take care to make sure your shooting hits home where you need it the most. There's no denying that a distinct feeling of glee can be found from eliminating a small unit, but sometimes your slings and arrows are far more suitably employed whittling down that massive infantry block that's working its way towards your lines. Make no mistake, shooting is unlikely to win the game for you, but every casualty it causes will help you when close combat starts.
All missile weapons have a maximum range that indicates the furthest distance they can shoot. A detailed summary of shooting weapons and their ranges can be found in the Weapons chapter.
A model can normally only shoot at a target if it lies within the maximum range of the weapon it is shooting with. The one exception to this is when a unit Stands and Shoots – here we assume that the charging enemy has entered the weapons' range before the unit shoots.
All models in a unit have to shoot at the same target. Due to the relative positions of the shooting unit and the target, it might happen that some models in a firing unit can shoot the target while other models in the unit cannot (the target may be out of their forward arc or completely obscured by terrain or other models).
Sometimes, some models in the shooting unit will be out of range. In these situations, you're free to continue with the shot, but only those models permitted to shoot the target (and that have it within their weapons' range) will fire.
such circumstances, we assume that disciplined troops such as Elves simply do not fire at all and conserve their ammunition. On the other hand, it's easy to imagine that more boisterous warriors, such as Goblins, loose their arrows in an impressive looking (but hopeless and impossibly inaccurate) volley.
In either case, for gaming purposes, these models do not shoot.
Models are not permitted to shoot at enemies that are engaged in close combat, for the simple reason that there's too much danger of hitting a friend! Remember that while a fight may look like two separate blocks of troops fighting head-to-head, it's actually a swirling melee where no one stays still long enough to offer a safe shot!
Some war machine weapons, particularly those that use templates, can accidentally hit friends whilst aiming at the enemy. The key word here is 'accidentally' – you cannot purposefully aim a template so that some of your models will be hit. See the War Machines chapter for more details on these weapons.
Roll a D6 for each shot fired. The model's Ballistic Skill determines what score they must equal or beat to hit their target after any modifiers have been applied.
Not all shots have the same chance of hitting. Some warriors are simply better at aiming than others, as reflected in a higher Ballistic Skill (BS). The higher the individual's BS, the greater his chance of hitting.
To determine whether you hit, you must make a roll to hit, i.e. you roll a D6 for each model that is shooting. Note that the number of Attacks a model has will not affect the number of shots – each model can shoot only once.
Count how many models in your unit are shooting and roll that number of dice. It is easiest to roll all the dice at once, although you don't have to. If there are a lot of models shooting, you might need to roll several batches of dice. The following table shows the minimum score you will need to hit.
| Ballistic Skill | 1 | 2 | 3 | 4 | 5 | 6 | 7 | 8 | 9 | 10 |
|---|---|---|---|---|---|---|---|---|---|---|
| To Hit Score | 6 | 5 | 4 | 3 | 2 | 1 | 0 | -1 | -2 | -3 |
Each dice that rolls a number equal to or greater than the value required has scored a hit. Each dice that rolls less is a miss.
For example, you fire with five Empire Archers. Men have BS 3, so you need a score of at least 4 to hit. You roll five dice and score 1, 2, 2, 4 and 6, which equals two hits and three misses.
Troops with a high BS have a To Hit score of 1, 0 or even a negative number (as shown above). Of course, you cannot roll less than 1 on a D6 so in Warhammer a To Hit roll of 1 on a D6 always fails, regardless of the dice modifiers and Ballistic Skill of the model.
Raw skill is not the only factor to determine the difficulty of a shot. Many battlefield conditions can alter the accuracy of missile fire, and we represent these with a series of shooting modifiers. Shooting modifiers are applied to the dice rolls before they are compared to the score needed to hit, making the shot more difficult, and therefore less likely to succeed.
Continuing the earlier example, if the five Empire archers had a -1 modifier applied to their shooting attack, all of the dice would count as rolling one point lower than they actually did. As a result, those dice would need to score a point higher, and instead of needing 4s to hit, they would now need 5s. Accordingly, only one archer would have hit.
The shooting modifiers are cumulative (except when noted otherwise), and are as follows:
Moving and Shooting
Firing at Long Range